
Decompiling recent python versions (up to 3.12)
Introduction
If you ever needed to decompile python .pyc files, then you know that versions 3.9 and above might be a bit problematic to deal with using the well known tools.
In this blog post I’ll explain my approach at dealing with such samples, but for completenes I’ll also briefly go though the general approach with pyinstaller binaries.
General approach
-
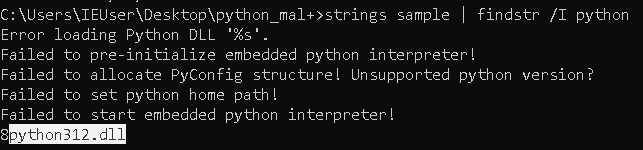
Find the python version
Search for strings containing"python". You’ll easily spot the python version with which it was compiled.
- Install that EXACT same version of python
- Download the latest version of pyinstxtractor
If I had a problem with the extracted pyc files, usually downloading the latest version of pyinstxtractor fixes the issue, so don’t skip this step. -
Use pyinstxtractor to extract the compiled python code from the executable
Runpyinstxtractorwith the same python version (the one just downloaded) with which the code was compiled.
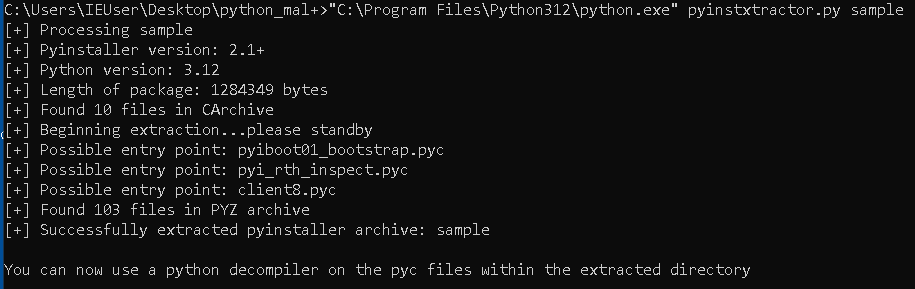
The script will extract all compiled modules and even suggest you the entry point.
- Use a python decompiler to decompile the pyc file.
At the time of writing, the well known tools for this task are:
These tools are usually working fine with python versions up to 3.8 or 3.9, but may have a problem decompiling newer python versions.
Decompiling python above 3.9
In cases where the above-mentioned tools fail, I resort to pycdc with a bit of a manual approach.
I always make sure I work with the latest pycdc, meaning that I have to compile it myself. The steps are the following:
- Make sure you have Visual Studio installed
- Clone the latest pycdc from github
- Open Developer PowerShell for VS
- Go inside the pycdc folder
- Generate a Visual Studio project file with the command
cmake . msbuild pycdc.sln - Open the project in Visual Studio and build it.
- The executable will be inside the “Debug” folder
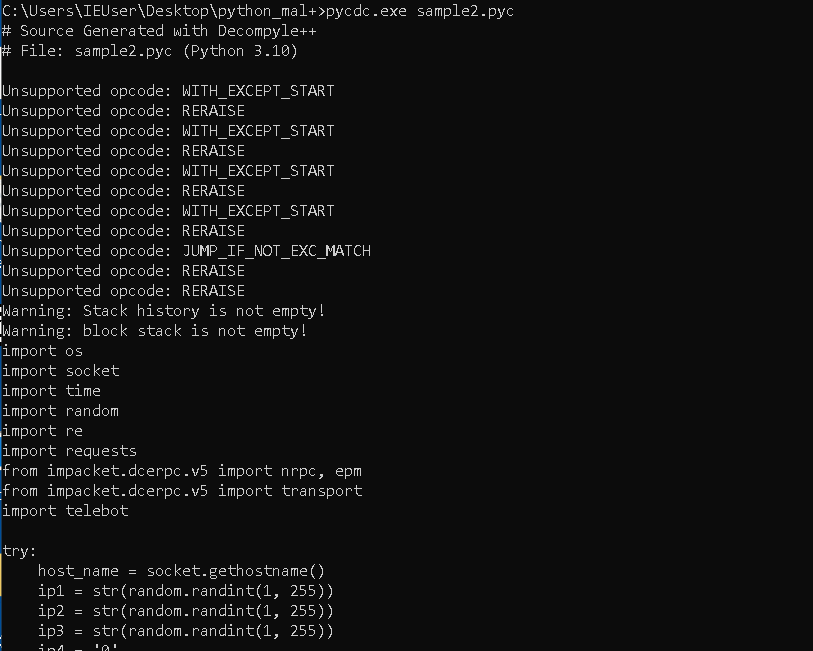
Let’s test it against a file compiled with python 3.10
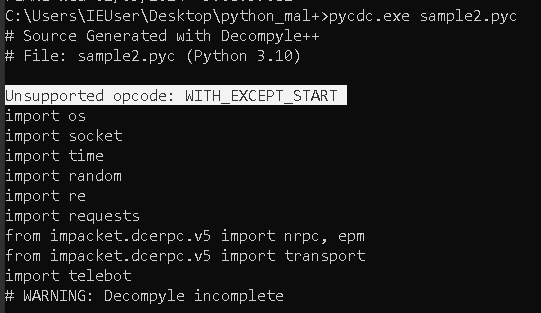
An error about an Unsupported opcode is thrown.
To deal with this, you can add “fake” support for this opcode. That way you bypass the error and decompilation will continue, although it may output wrong python code.
In my experience, even if the code is wrong it’s usually readable and correct enough to understand what it’s doing. After all, I don’t need a running code, I just need to know what it does.
To add such fake support, just add the mentioned opcode as a case statement inside ASTree.cpp. I usually add it at the end, before the default case, so I can easily find my modifications. The content of the case should have break for a body, like so:
	case Pyc::GEN_START_A:
		stack.pop();
		break;
	case Pyc::WITH_EXCEPT_START:  // <------ the added handler
		break;
	default:
		fprintf(stderr, "Unsupported opcode: %s\n", Pyc::OpcodeName(opcode & 0xFF));
		cleanBuild = false;
		return new ASTNodeList(defblock->nodes());
Or you could try to add proper support if you check the documenation for the opcode for the relevant python version. According to the documentation, the WITH_EXCEPT_START opcode “Calls the function in position 7 on the stack with the top three items on the stack as arguments.”. So we can sort-of try to handle it by popping the top tree items from the stack.
	case Pyc::GEN_START_A:
		stack.pop();
		break;
	case Pyc::WITH_EXCEPT_START:  // <------ the added handler
		stack.pop();
		stack.pop();
		stack.pop();
		break;
	default:
		fprintf(stderr, "Unsupported opcode: %s\n", Pyc::OpcodeName(opcode & 0xFF));
		cleanBuild = false;
		return new ASTNodeList(defblock->nodes());
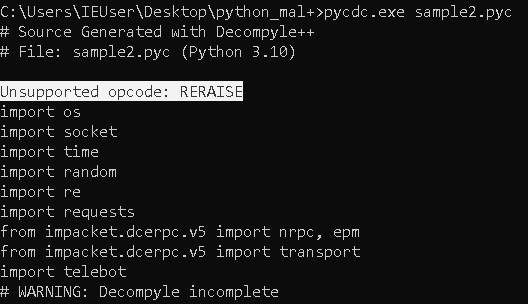
Testing it again, we get another unsupported opcode. You repeat the process until you add support for all necessary opcodes and decompilation proceeds uninterrupted.
Another way, without adding each failing opcode one by one, is to just add break in the default case, under fprintf.
default:
	fprintf(stderr, "Unsupported opcode: %s\n", Pyc::OpcodeName(opcode & 0xFF));
	break; // <----------------
	cleanBuild = false;
	return new ASTNodeList(defblock->nodes());
This will have the same effect and will also print to the console all unsupporeted opcodes.
Having all the unsupported opcodes listed is helpful in cases where pycdc crashes and you want to add proper support for them. Or if you want to add proper support, so the decompiled code is better.
Adding proper support can be tricky. I don’t understand completely how pycdc works, so my approach here is to fuck around and find out.
Generally what I do is:
- Check the python documentation what the opcode in question should be doing (verify you selected proper python version).
- Check how similar opcodes are handled in the pycdc code
- Try to implement the opcode using my combined understanding of the python docs and the pycdc code
- After some trial and error, I have a code with questionable quality, which does the trick and at least produces results
Sometimes I might encounter a different type of error.
For example, let’s run it against a file compiled with the latest python version. At the time of writing this is 3.12
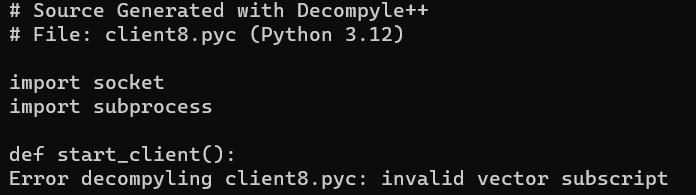
It produces invalid vector subscript exception.
Unfortunately the whole function which handles decompilation is enclosed in a try/except block, thus you can’t easily find where the exception happens.
    try {
        decompyle(mod.code(), &mod, *pyc_output);
    } catch (std::exception& ex) {
        fprintf(stderr, "Error decompyling %s: %s\n", infile, ex.what());
        return 1;
    }
You could debug the code or use printf statements under each case. I used notepad++ find/replace with following regex to quickly add printf.
Find: "        case Pyc::\w+:\n\s{9,}"
Replace: "$&DEBUG_PRINT\("DEBUG, LINE:%d\\n", __LINE__\);\n\s            "
Like so:
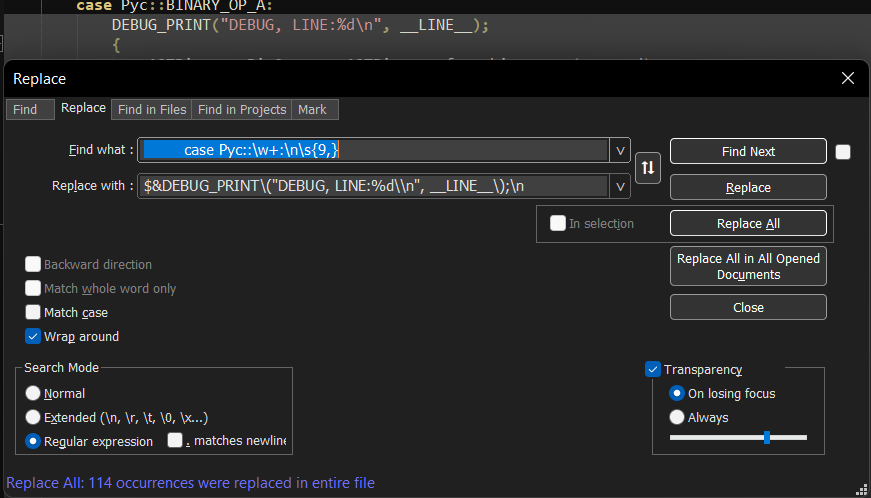
$& is replaced with the matched sequence (the case line), meaning that the end result of the operation is appending the debug line under the case.
Using __LINE__ will print the exact line in the source code where this specific DEBUG_PRINT is located.
Below is the macro for the DEBUG_PRINT:
#define DEBUG

#ifdef DEBUG
#define DEBUG_PRINT(...) fprintf(stderr, __VA_ARGS__)
#else
#define DEBUG_PRINT(...)
#endif
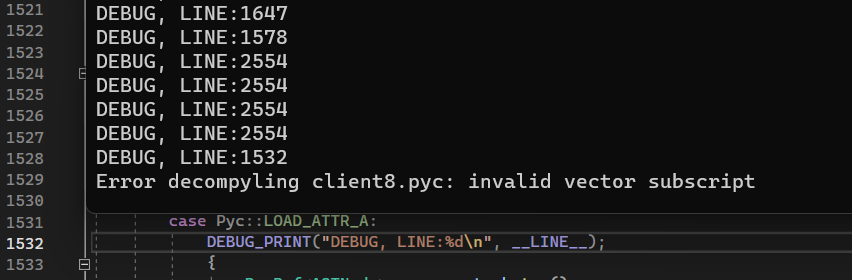
Building and running the new executable shows that the error occurs inside the handler for LOAD_ATTR_A opcode.
The documentaion for this opcode states the following:
LOAD_ATTR(namei)
If the low bit of namei is not set, this replaces STACK[-1] with
getattr(STACK[-1],co_names[namei>>1]).

If the low bit of namei is set, this will attempt to load a
method named co_names[namei>>1] from the STACK[-1] object.
STACK[-1] is popped. This bytecode distinguishes two cases: if STACK[-1]
has a method with the correct name, the bytecode pushes the unbound
method and STACK[-1]. STACK[-1] will be used as the first argument (self)
by CALL when calling the unbound method. Otherwise, NULL and the object
returned by the attribute lookup are pushed.

Changed in version 3.12: If the low bit of namei is set, then a NULL or
self is pushed to the stack before the attribute or unbound method respectively.
Notice that the documentation states in both caes the operand namei should be shifted right by 1 namei>>1. But in the code (shown below) the oprand is used as is (without shift).
case Pyc::LOAD_ATTR_A:
	{
		PycRef<ASTNode> name = stack.top();
		if (name.type() != ASTNode::NODE_IMPORT) {
			stack.pop();
			stack.push(new ASTBinary(name, new ASTName(code->getName(operand)), ASTBinary::BIN_ATTR));
		}
	}
	break;
Changing the code from code->getName(operand) to code->getName(operand>>1) fixes the issue and decompilation proceeds successfuly.
As stated in the documenation, the behavior of this opcode has changed a bit in version 3.12, but I’m unsure how to implement those changes correctly. This may produce errors in the decompiled python code, but as I said earlier - I don’t need 100% correct code, I just want to understand what it does.
Another exception you might encounter is "Bad MAGIC!". To deal with that, make sure the result of pyinxtractor is a correct PYC file (check it in a hex editor). The PYC file format starts with 4 bytes of magic bytes, followed by up to several header fields (depends on the python version used), and a marshalled code object. The 3rd and 4th magic byte should be \x0D\x0A respectively. The marshalled code-object starts with a byte which when AND-ed with 0x7F should be equal to 0x63. Below is an example of a proper PYC file:

If the proper header is missing or the magic is wrong, you could try fixing it yourself by adding/replacing with a header of a known good file (compiled with the same python version). Most of the times I fixed this error by just using the latest pyinxtractor and using the correct python version.
Dealing with pyarmor
This is a separate topic, but I wanted to add it here, because the methods used to deal with pyarmor are also useful for analyzing PYC files you can’t decompile. After all, in both cases you don’t have access to the actual souce code, so you can use similar methods for analysis.
Dynamic way
Run the executable, dump the process memory, check the strings, check network traffic, run in a sandbox, etc.
Module hooking/hijacking
This technique is really well explained in this youtube video.
It boils down to the following:
- Run the PYC and check for any errors about missing modules. This tells you what modules the script uses.
- Choose a module which would be useful to intercept (like crypto library, networking, encodings, etc).
- Create a new file with the chosen modules name, like so:
<module_name>.pyand content ofpass. Place it in the same directory as the PYC. - Run the PYC again. Depending on the error, implement the functionality which is missing (create an empty class or an empty function/method, whatever the error message says).
- Run the PYC again and if it complains about arguments, fix those also. As a body for the methods you can print the arguments which are passed to them. That way you intercept the input which the script passes to the library. For crypto library this could be decryption keys, plaintext data, for network library - addresses, domains, request body etc.
- Repeat until you have everythin you need. The errors on each run tell you what you need to implement and intercept.
Example:
- Run the script:
>"C:\Program Files\Python312\python.exe" client8.pyc
 Traceback (most recent call last):
File "client8.py", line 25, in <module>
File "client8.py", line 9, in start_client
 OSError: [WinError 10051] A socket operation was attempted to an unreachable network
In this case, there are no missing modules, instead the script uses the “socket” module which is part of the Python Standard Library and it gets loaded from the default python installation.
- I’ll intercept the socket module to check what kind of connection it will make.
- Create
socket.pywith contentpassand run again. - Runnig the PYC again
>"C:\Program Files\Python312\python.exe" client8.pyc Traceback (most recent call last): File "client8.py", line 25, in <module> File "client8.py", line 8, in start_client AttributeError: module 'socket' has no attribute 'socket' - Implement the socket class
class socket(_socket.socket): def __init__(self): pass - Run again:
>"C:\Program Files\Python312\python.exe" client8.pyc
 Traceback (most recent call last):
File "client8.py", line 25, in <module>
File "client8.py", line 8, in start_client
 AttributeError: module 'socket' has no attribute 'AF_INET'
I don’t know how to properly define AF_INET, but fortunately the socket.py source code is available, so I can properly re-implement it.
import _socket
from _socket import *

class socket(_socket.socket):
	def __init__(self, family=-1, type=-1, proto=-1, fileno=None):
		pass
Running again:
>"C:\Program Files\Python312\python.exe" client8.pyc
 Traceback (most recent call last):
   File "client8.py", line 25, in <module>
   File "client8.py", line 9, in start_client
 OSError: connect(): bad family
I will add the rest of the __init__ method and then define the connect() method:
import _socket
from _socket import *

class socket(_socket.socket):
 	def __init__(self, family=-1, type=-1, proto=-1, fileno=None):
     	if fileno is None:
         	if family == -1:
             	family = AF_INET
         	if type == -1:
             	type = SOCK_STREAM
         	if proto == -1:
             	proto = 0
     	_socket.socket.__init__(self, family, type, proto, fileno)
     	self._io_refs = 0
     	self._closed = False

 	def connect(self):
     		pass
Running again:
>"C:\Program Files\Python312\python.exe" client8.pyc
 Traceback (most recent call last):
   File "client8.py", line 25, in <module>
   File "client8.py", line 9, in start_client
 TypeError: socket.connect() takes 1 positional argument but 2 were given
I added the argument and a print function to show what is passed to the connect() method.
 	def connect(self, arg):
     		print(arg)
Running it again, we get the IP and the port to which it will connect:
>"C:\Program Files\Python312\python.exe" client8.pyc
 ('192.168.1.30', 5555)
 Traceback (most recent call last):
   File "client8.py", line 25, in <module>
   File "client8.py", line 12, in start_client
 OSError: [WinError 10057] A request to send or receive data was disallowed because the socket is not connected and (when sending on a datagram socket using a sendto call) no address was supplied
Custom CPython interpreter
Re-compile CPython to dump byte code at PyEval_EvalFrameDefault(). This function executes the python byte-code, therefore it should be in a state after pyarmor protections.
To understand CPython source code and how to compile it I highly recommend checking CPython source code guide. And for the necessary modifications I recommend this youtube video and FLARE-ON9-Chal11_Unpacking-Pyarmor (but also check the other links in the Resources section).
This approach can also be used for scripts you can’t decompile. You could modify CPython to print the contents of strings (or other data types) every time they’re initialized, used or changed. String objects and their methods are defined in unicodeobject.c.
I made my own custom python interpreter by modifying all relevant methods in unicodeobject.c to print the string object contents after every operation. Depending on the data type you could print the string directly, or you might have to convert it first using the appropriate methods:
printf("STRING: %.*s\n", (int)size, s);
printf("STRING: %s\n", PyUnicode_DATA(PyUnicode_FromObject(unicode_obj)));
printf("STRING: %s\n", PyUnicode_DATA(unicode));
For example:
static Py_hash_t
unicode_hash(PyObject *self)
{
	printf("STRING unicode_hash: %s\n", PyUnicode_DATA(self));
Here is an example using a binary from Huntress CTF which is protected with pyarmor:
> python snake_eaterII.exe_extracted\snake_eater.pyc | findstr /I flag
<..snip..>
STRING resize_compact: flag{be47387ab77251ecf80db1b6725dd7a
STRING _copy_characters_to: flag{be47387ab77251ecf80db1b6725dd7ac
STRING PyUnicode_Append: flag{be47387ab77251ecf80db1b6725dd7ac
STRING resize_compact: flag{be47387ab77251ecf80db1b6725dd7ac
STRING _copy_characters_to: flag{be47387ab77251ecf80db1b6725dd7ac}
STRING PyUnicode_Append: flag{be47387ab77251ecf80db1b6725dd7ac}
STRING unicode_length: flag.txt
STRING unicode_result_unchanged: flag.txt
STRING _PyUnicode_FromASCII: flag.txt
STRING unicode_length: flag.txt
STRING _copy_characters_from: flag.txt
STRING _copy_characters_to: \Users\lab\AppData\Roaming\Microsoft\Internet Explorer\Quick Launch\flag.txt
STRING PyUnicode_Append: \Users\lab\AppData\Roaming\Microsoft\Internet Explorer\Quick Launch\flag.txt
STRING unicode_length: \Users\lab\AppData\Roaming\Microsoft\Internet Explorer\Quick Launch\flag.txt
STRING _copy_characters_from: \Users\lab\AppData\Roaming\Microsoft\Internet Explorer\Quick Launch\flag.txt
STRING _copy_characters_to: C:\Users\lab\AppData\Roaming\Microsoft\Internet Explorer\Quick Launch\flag.txt
STRING PyUnicode_Concat: C:\Users\lab\AppData\Roaming\Microsoft\Internet Explorer\Quick Launch\flag.txt
BYTES PyBytes_Repr: b'flag{be47387ab77251ecf80db1b6725dd7ac}'
Disassembly
If everything else fails, you could resort to disassembling the PYC and try to understand what it does on a byte-code level. For the dissassembly you could use:
- pycdas from the pycdc project
- dis python module (works only for the same python version as the PYC you’re analyzing)
- xdis
- Python Snippet decompiler
Resources
- https://youtu.be/oqS3aj2yS68?t=294
- https://realpython.com/cpython-source-code-guide/
- https://github.com/levanvn/FLARE-ON9-Chal11_Unpacking-Pyarmor
- https://www.ghettoforensics.com/2022/11/flare-on-9-worst-writeups.html
- https://jackfromeast.site/2022-12/snyk-2022-writeup.html#pay-more-attention
- https://youtu.be/1Q6Mti0mRao?t=3075
- https://devilinside.me/blogs/unpacking-pyarmor
- https://www.pkusinski.com/sekai-ctf-2022-writeup-symbolicneeds/